
Congratulations! You’ve just received a new PC, taken it out of the box, plugged it in and powered it up for the first time. Everything works decently, but before you start gaming or posting to Facebook, there are some Windows settings that you need to change. Whether through an over-abundance of caution or a desire to pander to computer-illiterate users, Microsoft has some default preferences that will slow you down.
We’ve assembled a list of more than a dozen different options to change, which will make your experience more productive and less annoying. If you’re building a computer and need to install an OS, see our article on how to get Windows 10 for Free or Cheap.
Unhide File Extensions and Hidden Files
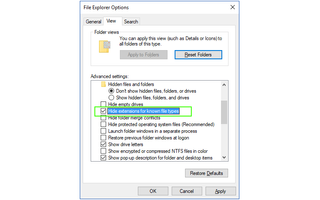
Clearly, Microsoft thinks that file extensions are too complicated for the unwashed masses. So, by default, Windows 10 hides the “.docx” or “.jpg” or “.exe” suffixes that appear at the end of file names. This way, when you get a spreadsheet from a friend, File Explorer will show that it’s a “Microsoft Excel Worksheet” whether it’s an Excel 2003 .xls file or a modern-day .xlsx file. Good luck with that!
To make file extensions visible again, enter “file extensions” in the Windows search box, click “Show or Hide File Extensions” and then uncheck “Hide Extensions for Known File Types.” While you’re at it, toggle “Show hidden files, folders and drives” to on so you can see all your system files.
Keyboard Shortcuts for Favorite Apps
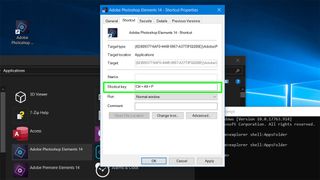
Every time you roll your pointer across the screen, launch the Start menu and click an icon to launch one of your favorite apps, you’re wasting a little time. Create keyboard shortcuts for your favorite apps and you can launch them by hitting a single key combo such as CTRL + ALT + W to launch Microsoft word or CTRL + ALT + C for Chrome.
To create keyboard shortcuts, first open the command prompt (you can get there by searching for “command”) and enter “explorer shell:AppsFolder” (without the quotes). A window with icons for all of your installed apps opens and you should then drag the app you want onto your desktop. Right click the desktop shortcut icon and select properties. Then enter a key combo, usually one that includes ALT + CTRL + LETTER, into the “Shortcut key” box and click Ok. Repeat for all your favorite apps.
Get Rid of the Useless Lock Screen
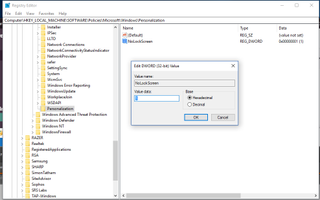
When your computer is locked (or first boots), by default, Windows 10 shows you a lock screen with the time, a wallpaper and maybe (if you allow) some notifications. If you use Windows Hello facial or fingerprint recognition, you can log in by staring at the screen or putting one of your digits on the scanner. But, if you use a password, you have to click to dismiss the lock screen before the OS will allow you to enter your credentials.
That’s one extra, unnecessary click every single time you want to unlock your PC. To get rid of the annoying lock screen and save your tired fingers,open the registry editor and navigate to HKEY_LOCAL_Machine\SOFTWARE\Policies\Microsoft\Windows and create a new key called Personalization if it doesn’t already exist. Within the Personalization key, create a DWORD (32-bit) value called NoLockScreen and set it to 1.
Force Windows to Close Apps at Shutdown
It’s so annoying. You go to shutdown or restart your PC and you walk away, expecting your computer to be powered off (or rebooted) by the time you come back. You go to the fridge, grab a drink and return to find a message on your screen that says you have apps which aren’t closed.
Maybe you just had a nearly-empty notepad doc or a picture in Photoshop that you didn’t want to save because you already copied and pasted the data into another app. Now, Windows is nagging you to go back and close all your apps manually. Yes, Windows gives you a button that says “Shut down anyway,” but you have to hit it and wait for the system to hopefully force close the apps.
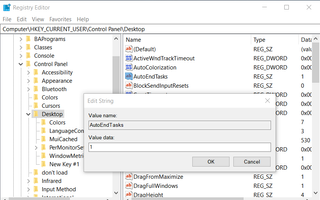
The best solution is to open the registry editor, navigate to \HKEY_CURRENT_USER\Control Panel\Desktop and create three strings (if they don’t already exist). Create AutoEndTasks and set it to 1, create WaitToKillAppTimeOut and set it to 2000. Finally, create HungAppTimeOut and set that to 2000 also. These automatically force-close any open apps after a 2000-millisecond (2 second) delay (shorter delays could be problematic because it wouldn’t give apps that are closing time to close themselves).
Change the Title Bar Colors
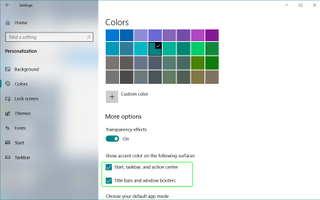
Windows 10’s default title bar color is a bland white, which is not only boring, but kind of hard to look at. Fortunately, it’s easy to assign an accent color to title bars, the Start Menu and the taskbar.
Navigate to Settings->Personalization->Colors, pick a color and check the boxes next to “Start, taskbar and action center” and “Title bars and window borders.”
Switch Default Browsers
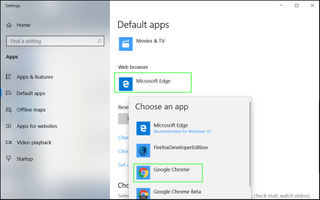
There’s a reason why Microsoft Edge has only 4 to 6 percent of the desktop browser market. It’s not a bad browser, but most people prefer the rich ecosystem of extensions and broad support that Chrome and Firefox enjoy. If Microsoft Edge opens the site every time you click a link in your email software or instant messaging app, you need to change the default browser.
To change your default browser, first make sure you have the new browser installed. Search for “default apps” in the Windows search box and click the top result. Scroll down to “web browser,” click the Edge icon and choose the browser you want to use.
Prevent Windows From Re-Opening Apps On Restart
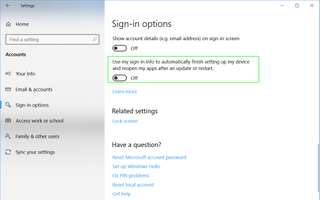
You have a ton of programs open — so many that it’s taxing your computer’s system resources and causing lots of lag. You decide to restart your computer so to clear out the memory, but when you log in again, the OS opens all the same programs you had active before. Microsoft thinks it’s doing you a favor by letting you pick up where you left off, but you’d be better off only re-opening the apps and tabs that you need right now.
To stop Windows 10 from automatically re-opening programs on reboot, navigate to Settings->Accounts->Sign-in Options and scroll down to the Privacy subhead. Then turn the toggle to off for “Use my sign-in to automatically finish setting up my device and reopen my apps after an update or restart.”
Protect Your Privacy
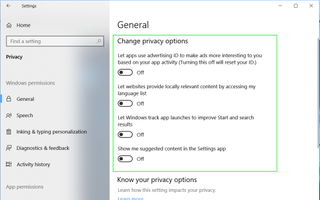
By default, Windows 10 shares a lot of data with Microsoft about your usage habits. Fortunately, by changing a few settings, you can keep at least some of your information out of the software giant’s hands.
Navigate to Settings->Privacy and toggle all the settings to off. These currently include four options: “Let apps use advertising ID, ” “Let websites provide locally relevant content,” “Let Windows track app launches” and “Show me suggested content.”
Enable System Protection / Restore Points
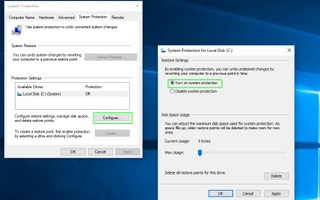
If something, like a bad driver, prevents Windows from booting or causes frequent blue screens of death, one likely solution is to return Windows 10 to its previous state. The best way to take a step back to a previous configuration (with the old driver or update or settings) is to do a system restore.
However, by default, System Protection, the feature which creates restore points you can return to, may be off. Turn on System Protection by typing “restore point” into the search box, clicking the top result, selecting your boot drive (usually C drive) , hitting the Configure button and then toggling “Turn on system protection” to on. We recommend setting maximum disk space usage to at least 5GB. Also you’ll want to click the “Create” button to set up your first restore point.
Enable Storage Sense to Save Space

Unless you have a 2TB SSD in your system, you can always use more free space. Windows 10 has an optional feature called Storage Sense, which automatically purges files you no longer need in order to free up precious gigabytes for you.
To enable Storage Sense, navigate to Settings->System->Storage and then click “Change how we free up space automatically.” Toggle Storage Sense to On, Then click “Change how we free up space automatically,” set it to run every day and to delete files in your recycle bin and downloads folder every 14 days (or every day if you want to be more aggressive).
After you’ve changed those settings hit the Clean Now button to free some space right away.
Adjust Your Display Scaling
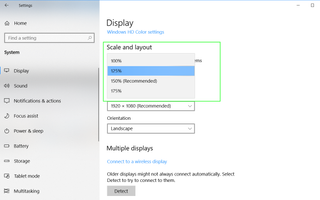
Out of the box, Windows decides how large to make the text, icons and other widgets. A lot of the time, particularly on laptops, the operating system decides to operate at 150 percent or larger scaling, which makes it easier read but lets you fit less on the screen.
To adjust the scaling to meet your personal preferences, navigate to Settings->System->Display and scroll down to the “Scale and layout” header. Then try different percentages until you find the one that works best for you. If you can see 100 percent scaling comfortably, that’s ideal, because it provides the most screen real estate.
Enable Dark Mode
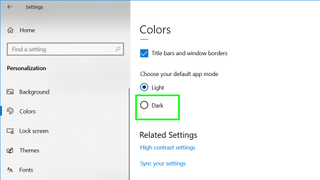
Many users, including yours truly, prefer dark text on a light background. By default, all of Windows 10’s menus are in light mode with black text on white. However, you can enter Dark Mode by navigating to Settings->Personalization->Colors and selecting Dark under the “choose your default app mode” header.
We’ve also got a tutorial on how to Dark mode everything, not just for Windows 10’s built-in menus but for everything in your OS from Microsoft Office to Gmail.
Set Up Fingerprint or Facial Recognition
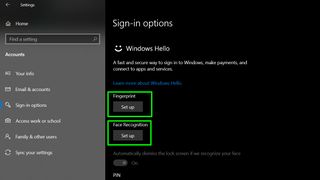
Why waste time typing in a password when you can create log into Windows 10 with either a finger scan or facial recognition. If your computer has either a fingerprint reader or an IR camera, you can use the operating system’s Windows Hello feature to unlock the computer, no typing required.
To set up Windows Hello, navigate to Settings->Accounts->Sign-in Options and click the Set up button under Fingerprint or Face Recognition. If you don’t already have one, you’ll be asked to create a PIN, which you can also use to log in and is faster to type than a password.